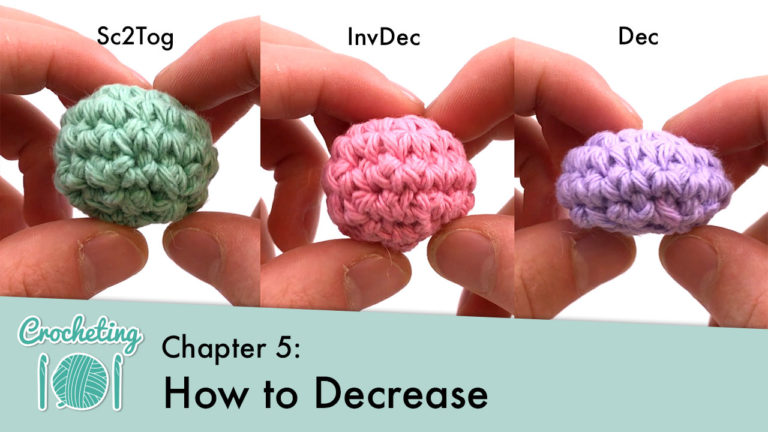
Chapter 5: Decreasing
Part of Crocheting 101: How to Crochet for Complete Beginners

Beginner

Louie's Loops
Designed by
Video tutorials
Main Video
What you'll learn
What you'll need

Cotton Yarn
Weight

Colors

Crochet Hook
G6 / 4.00 mm
Abbreviations used
ch
Chain Stitch
st
Stitch
sc
Single Crochet
inc
Increase
dec
Decrease (Sharp)
invdec
Invisible Decrease
sc2tog
Single Crochet 2 Together
yo
Yarn Over
Useful information
Pages
67-78
Pattern steps

01
Single Crochet 2 Together (sc2tog)
00:55
In patterns you’ll often see “dec” written as the abbreviation for a decrease. Usually, they are referring to this method. But a more accurate abbreviation (which you also will find in patterns) is “sc2tog”.

This the easiest method, but in my opinion not the best mostly because it can be very noticeable and doesn’t decrease as sharply as other methods. That being said, the “Single Crochet 2 Together” is the method you should use as a beginner.
Step 1: Insert the hook in the next st, yo (yarn over) and pull through


Step 2: Now repeat the process, Insert the hook in the next st, yo and pull through again.


There should be 3 loops on the hook now
Step 3: Finally, yo and pull a loop through all 3 loops on the hook to finish the stitch.


02
Sharp Decrease (dec)
1:39
I like to simply call this a decrease, but the correct name would be the sharp decrease, or a slip stitch 2 together (slst2tog). This is because it can be used to make a really flat and sharp end to your piece. It’s great to use at the end of your amigurumi projects to really close in the hole, but I wouldn’t use it throughout a project because it can be very noticeable.

Step 1: Insert the hook in the next st, yo (yarn over) and pull through


The beginning of this stitch is exactly the same as the sc2tog, but the end is different.
Step 2: Insert the hook in the next st, yo and pull through again.
Then pull this same loop through the two on the hook.


Notice how this really pulls the stitch in and makes it close in more rapidly. Great if you need to make a flat bottom, but not if you were trying to make a less noticeable decrease, like in a beanie.

03
Invisible Decrease (invdec)
2:35

A personal favorite; like the name suggests, the invisible decrease (aka: InvDec) is the least noticeable decrease. It’s mostly used in amigurumi, but can really be used for any pattern as long as you’re working in the round. It’s a great alternative to the sc2tog.
The two cons are that invisible decreases can be a bit difficult to do at first, and they don’t decrease as drastically as the other method (sharp decrease) will.
But before we learn this awesome stitch, we need to talk about the front and back loops of your stitch again…
The Front and Back Loops/h3>
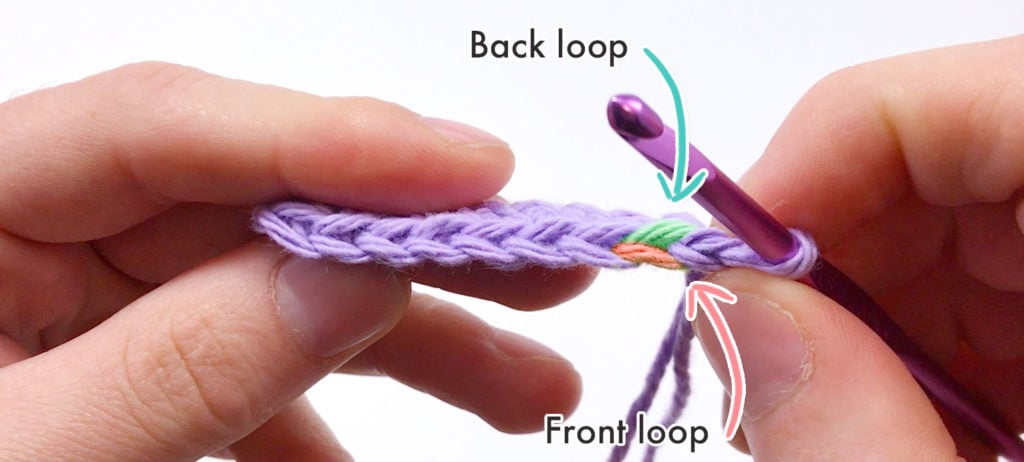
Okay, so now that you know the difference between front and back loops, let’s learn the invisible decrease:
Step 1: Insert the hook in the front loops of the next 2 stitches

The easiest way to do this is to go one by one


Step 2: Now you just have to make a single crochet.
yo, and pull through the two front loops.


Finish by yo again then pulling through the last two loops on the hook.


I rarely, if ever use the sc2tog for my pieces. This is because its basically the same thing as the InvDec, but more noticeable. Think about what you’re trying to accomplish in your piece before you choose which method to use.
04
Skipping Stitches
4:25

I should also mention you can also skip stitches to decrease. It’s really only useful at the very beginning of a Row when you’re working flat. I left it out of the list because:
A) It’s really easy and obvious, you just… skip a stitch..
B) It’s the worst method to use when your working in the Round because it leaves big holes in your piece, so, disclaimer: do not use skipping stitches to decrease in the round.
05
When to Decrease
4:49
Now if you want to use a decrease in your piece and you’re working in the Rnd, what do you do?
Well, you can decrease at any time you want, but to make it even and steady we have to decrease evenly throughout your piece. Remember how when we were increasing we only increased by what we made in our first Rnd (6)?
When you’re starting out crocheting, I highly suggest you stick to the exact same method but replace the increases in the tutorial with decreases.

For example, we have 18 stitches and we want to go evenly by the same amount we started with (6 stitches in Rnd 1, remember?), so we decrease 6 times throughout the round. Where we do this is the same as increases too.
Let’s look back at Rnd 3 from Chapter 4 (not Row 3, but Rnd 3, when we were increasing in the Rnd).
Rnd 3: [sc 1, inc] repeat 6 times total (18)
In that Rnd we:
sc 1 in the first stitch, then increased in the next, repeating that process 6 times total, and ended up going from 12 stitches, up to 18.
Now we are going to do the same thing but decrease instead of increase.
[sc 1, dec 1] repeat 6 times (12)
Now that you know the basics to decreasing, we can finally, make three-dimensional projects like amigurumi. You’ll also have to learn how to stuff and sew a piece together though, which we’ll go over in our next project for a sphere / hacky sack and again in Chapter 10.
Other patterns to try
Community posts
Community Showcase

Sc2tog
Submitted by rita-medvedskiy


Why do I have to watch previous lesson to do this one? Aargh!
I don’t fully understand where to start from. Is it the same start as the coaster or different because it’s a bit more spherical?
What do we start on though? 🙁
You go straight into decreasing but what has to be made before that
It looks like the start of what we did in the last chapter but it’s more spherical in shape so I doubt that’s the case 🙁
What is a good starting point to practice decreasing?
It looks like you started with a round of increasing circle stiches – but how many did you do?
This lesson seems to start in the middle of a thought and it’s very frustrating to figure out for a beginner.