Chapter 2: Let’s Get Hookin’
Part of Crocheting 101: How to Crochet for Complete Beginners

Beginner

Louie's Loops
Designed by
Video tutorials
Main Video
What you'll learn
What you'll need

Cotton Yarn
Weight

Colors

Crochet Hook
G6 / 4.00 mm
Abbreviations used
ch
Chain Stitch
st
Stitch
yo
Yarn Over
Pattern steps

01
The Slip Knot
00:32
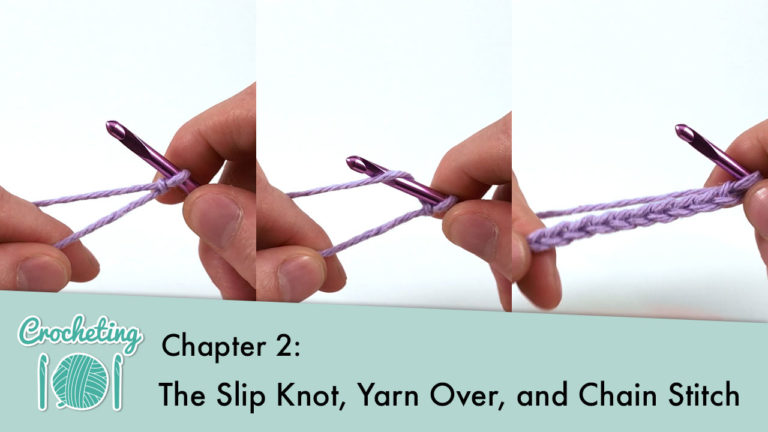
The slip knot is the first step to begin most crocheted projects. Think of it as kind of a mini noose; you can pull one end and it will tighten or close the loop, but when you pull the other end nothing happens. They’re very easy to make, here’s how:
Step 1: Lay the yarn flat.

Step 2: Make a loop with the short end over the long end (the one connected to the ball of yarn).

Step 3: Turn the loop over on itself, making it look a bit like a pretzel.


Step 4: Pull the inside string (the one closest to the long end) up and pull the knot tight.
Done! Now just tighten the slip knot around the hook, but not too tight.


You may see abbreviations used in crochet patterns throughout this pattern. Look for abbreviations like (yo). You can find a list of these above.
We’ll go over this more in Chapter 9.
02
The Yarn Over (yo)
1:23
A yarn over, or ‘yo’, is the term used for how you get the yarn on the hook. How it’s done is pretty much in the name itself; you literally put the yarn around the hook. Make sure to grab the yarn from the back, rather than from the front.


The next step is going to be pulling that yarn through the hole, so you want to make sure you have a good hold on the yarn by keeping it taut with your left (or non-dominate) hand, specifically with your bottom three fingers.

Notice above how the yarn is over the hook rather than the hook being over the yarn. The best technique when starting is to literally put the yarn over the hook with the left hand.

Notice above how the hook is on top of the yarn. This will cause a bunch of problems like awkward stitches and yarn splitting.
Splitting the yarn means grabbing only half of the yarn and splitting it in half. This can lead to weird stitches and over-stretched yarn, and happens more or less often depending on the type of yarn you use.

Splitting the yarn
03
The Chain Stitch (ch)
2:26
While the chain stitch might not be your
most used stitch, it’s definitely the most important to learn and perfect; this is because it requires the fundamental techniques for all the other stitches.
It also is what lays the base of your piece. Say you want to make a scarf and have it be 12” wide, well the chain stitch is going to be the first thing you make and will dictate all of the rest of the stitches in your piece.

Basically I’m saying learn how to do chain stitches really well and it will make the rest of your crocheting a lot easier.
Step 1: With your hook in the slip knot, and using your index and thumb to pinch just below the ‘tail’ – yarn over the yarn held with your left (non-dominate) hand.


Step 2: Adjust your grip to be pinching on the knot, or close to the circle, then pull the yarn on that’s hooked through the loop.

Done! That’s seriously it! Now keep yarning over and pulling through to make more chains!
Chain from the front

Chain from the back
Other patterns to try


Community posts
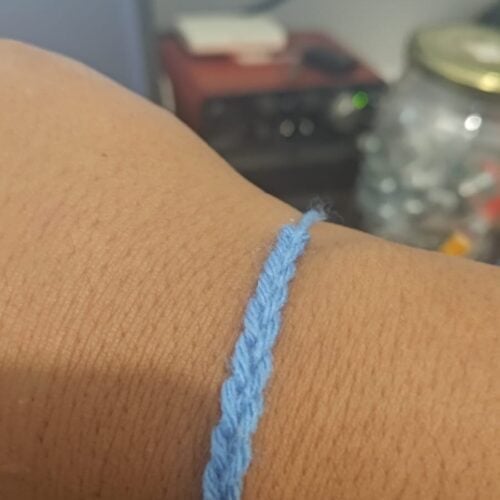
Community Showcase
cadena/chain
Submitted by Robinson A.
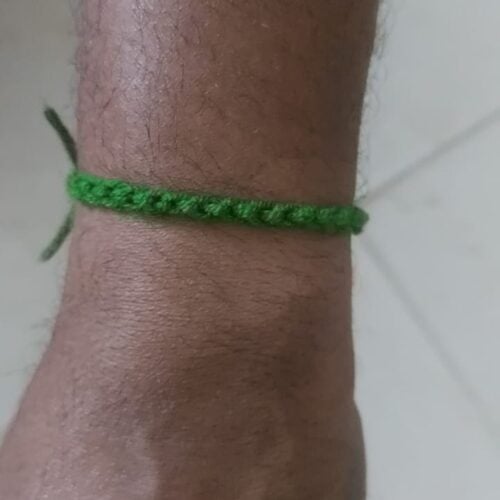
Bracelet-Subha Moses
Submitted by subha_moses


Great lesson